随着卫星遥感技术的发展以及地球观测卫星数量的持续增加,地理空间数据的规模正以前所未有的速度增长。 为了更有效地管理、存储和分发这些海量数据,各大云计算平台如亚马逊AWS、Google Earth Engine、Microsoft Planetary Computer以及NASA都建立了各自的地理空间数据生态系统。这些生态系统除了汇聚海量数据资源,还依托其强大的算力资源,集成地理空间数据分析软件工具,为用户提供“存-算-用”一体化数据分析环境。本文将详细介绍这些平台及其数据资源的基本情况、使用方法和实际应用案例等,帮助研究人员和开发者充分利用这些宝贵的数据资源。
一、AWS开放数据生态系统
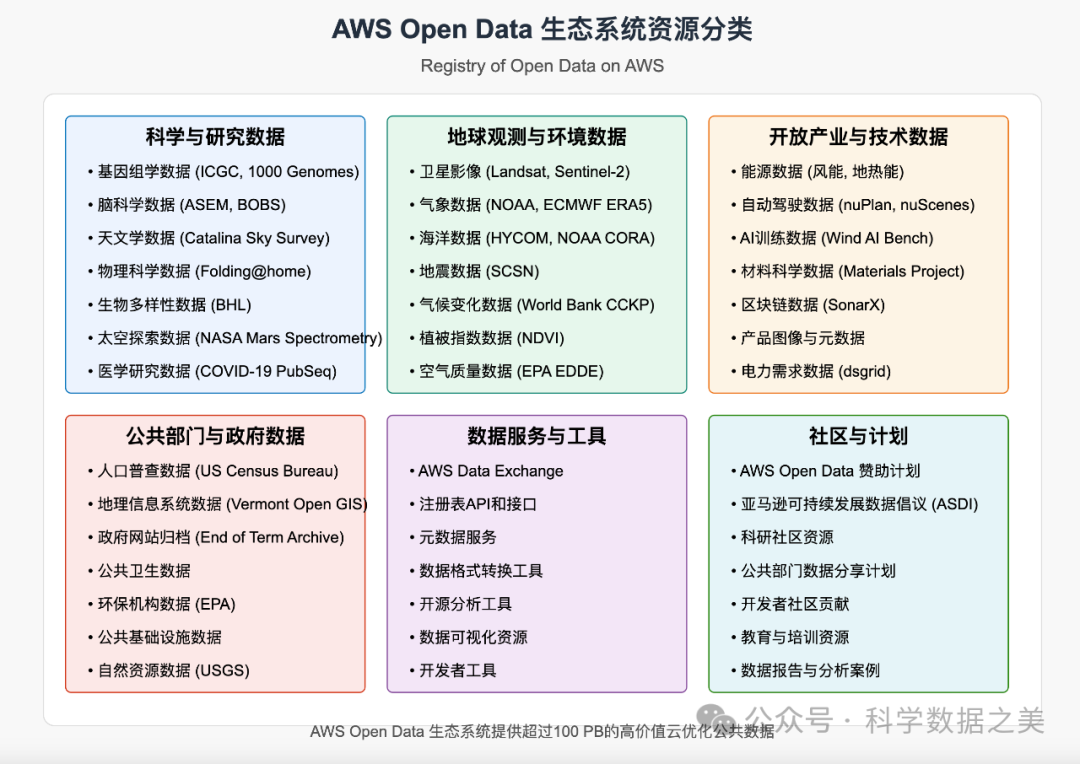
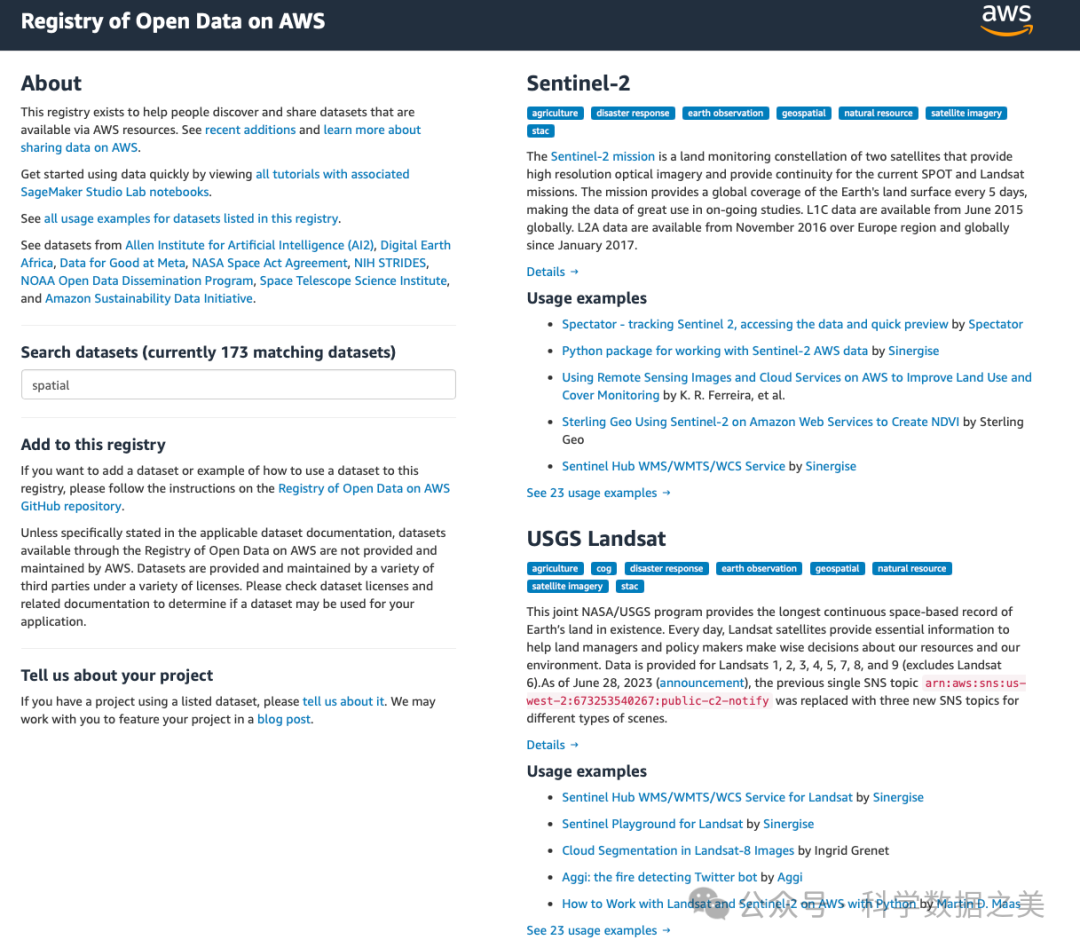
亚马逊AWS的开放数据计划通过AWS云计算基础设施托管关键的地理空间数据集,使公众能够免费访问和分析这些数据。 该项目目前托管了数百个数据集,涵盖地球观测、天气和气候、生命科学、政府数据等领域。
AWS开放数据中的地理空间数据主要包括:Landsat-8/9卫星影像、MODIS数据、Sentinel-1/2数据、NOAA天气数据、高分辨率数字高程模型(如NASADEM)、全球土地覆盖数据等。这些数据直接存储在Amazon S3存储桶中,可以使用各种工具和服务进行访问和分析。
地址:https://registry.opendata.aws
使用方法
AWS开放数据集可以通过多种方式访问:
1.直接通过S3访问:使用AWS SDK或CLI工具
import boto3
# 无需AWS凭证即可访问公共数据集s3 = boto3.client('s3', region_name='us-west-2')
# 列出Landsat-8公共数据集中的文件response = s3.list_objects_v2( Bucket='usgs-landsat', Prefix='collection02/level-2/standard/oli-tirs/2021/042/034/LC08_L2SP_042034_20210101_20210308_02_T1/')
# 打印文件列表for content in response['Contents'][:5]: print(content['Key'])2.通过STAC API访问:利用标准化的STAC接口
import pystac_clientfrom pystac.extensions.eo import EOExtension
# 连接到AWS的STAC Endpointcatalog = pystac_client.Client.open( "https://landsatlook.usgs.gov/stac-server", headers=[])
# 搜索特定区域和时间范围的Landsat数据search_results = catalog.search( collections=["landsat-c2l2-st"], bbox=[-122.5, 37.5, -122.0, 38.0], datetime="2022-01-01/2022-12-31", query={"eo:cloud_cover": {"lt": 20}})
# 获取搜索结果items = list(search_results.get_items())print(f"找到 {len(items)} 个项目")
# 访问第一个项目的数据if items: item = items[0] print(f"获取到的影像日期: {item.datetime.strftime('%Y-%m-%d')}")输出结果:
找到 78 个项目获取到的影像日期: 2022-12-133. 使用AWS数据交换:AWS Data Exchange是一项使客户能够在AWS上轻松查找、订阅和使用第三方数据的服务。
二、Google Earth Engine平台
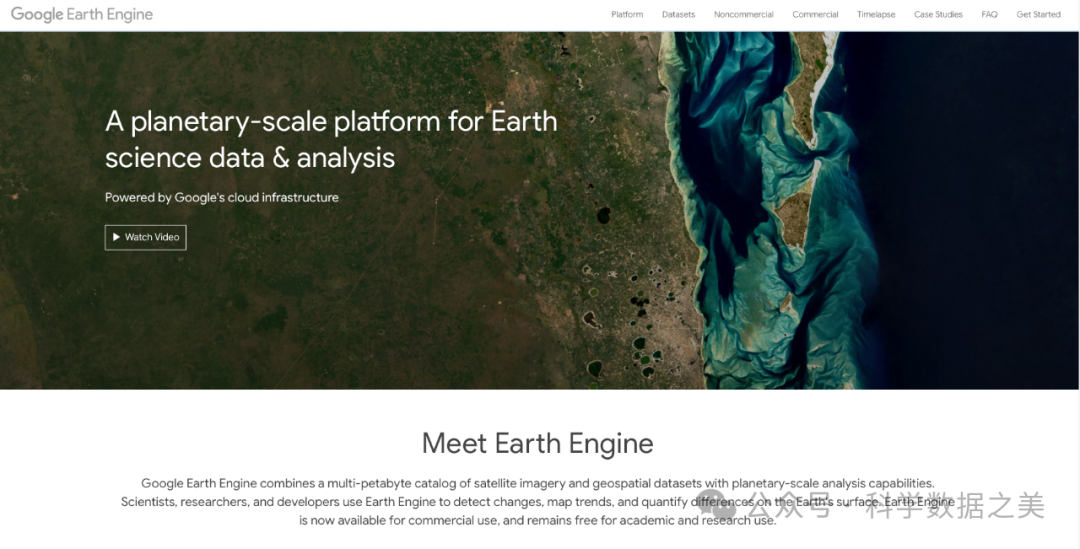
Google Earth Engine(GEE)是一个基于云计算基础设施的地理空间数据分析平台,专为处理海量地球观测数据而设计。该平台集成了超过40PB的卫星影像和地理空间数据集,以及用于分析这些数据的高性能计算能力。 GEE的数据目录包含了从1972年至今的完整Landsat系列档案、完整的Sentinel-1/2/3/5档案、MODIS数据产品、气候和天气数据集、土地覆盖数据、社会经济数据集等。
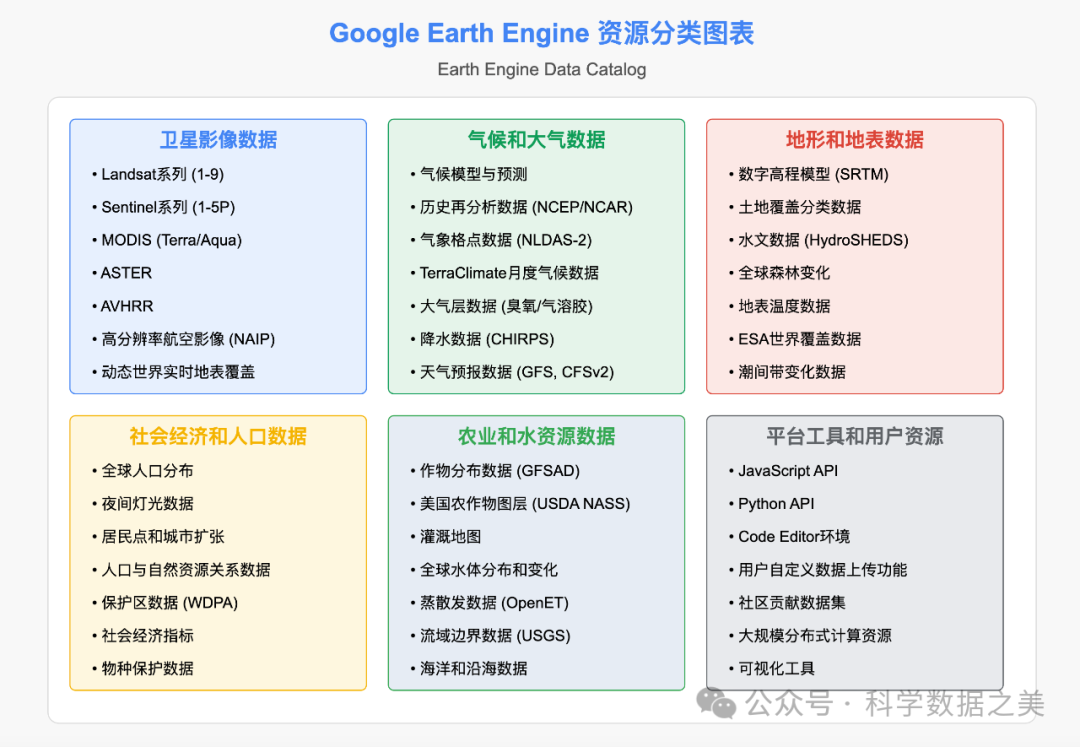
GEE的核心优势在于其强大的分布式计算架构,能够在数分钟内完成传统方法需要数月时间的计算任务。此外,GEE提供了JavaScript和Python两种API接口,使研究人员能够轻松编写和运行分析算法。基于Web的Code Editor环境提供了交互式开发体验,包括代码编辑、可视化结果、数据浏览和共享功能。用户可以通过这些工具快速原型设计和测试复杂的地理空间分析工作流程。
对于需要更复杂分析的用户,GEE的Python API可以与其他科学计算库(如NumPy、Pandas、scikit-learn等)无缝集成,扩展分析能力。
地址:https://earthengine.google.com
使用方法
使用Google Earth Engine需要先创建一个Google账户并注册GEE访问权限。注册后,您可以通过Code Editor(基于JavaScript的在线IDE)或Earth Engine Python API访问和分析数据。
1.使用JavaScript API (Code Editor)
https://code.earthengine.google.com 登录Google账户。
// 加载Landsat 8数据集var landsat = ee.ImageCollection('LANDSAT/LC08/C02/T1_L2') .filterDate('2020-01-01', '2020-12-31') .filterBounds(ee.Geometry.Point(-122.3578, 37.7726));
// 选择云量较少的影像var image = landsat.sort('CLOUD_COVER').first();
// 计算NDVIvar nir = image.select('SR_B5');var red = image.select('SR_B4');var ndvi = nir.subtract(red).divide(nir.add(red)).rename('NDVI');
// 可视化参数var ndviParams = {min: -0.2, max: 0.8, palette: ['blue', 'white', 'green']};
// 添加图层到地图Map.centerObject(image, 8);Map.addLayer(image, {bands: ['SR_B4', 'SR_B3', 'SR_B2'], min: 7000, max: 30000}, 'True Color');Map.addLayer(ndvi, ndviParams, 'NDVI');
// 导出结果到Google DriveExport.image.toDrive({image: ndvi,description: 'NDVI_SF_2020',scale: 30,region: image.geometry(),maxPixels: 1e13});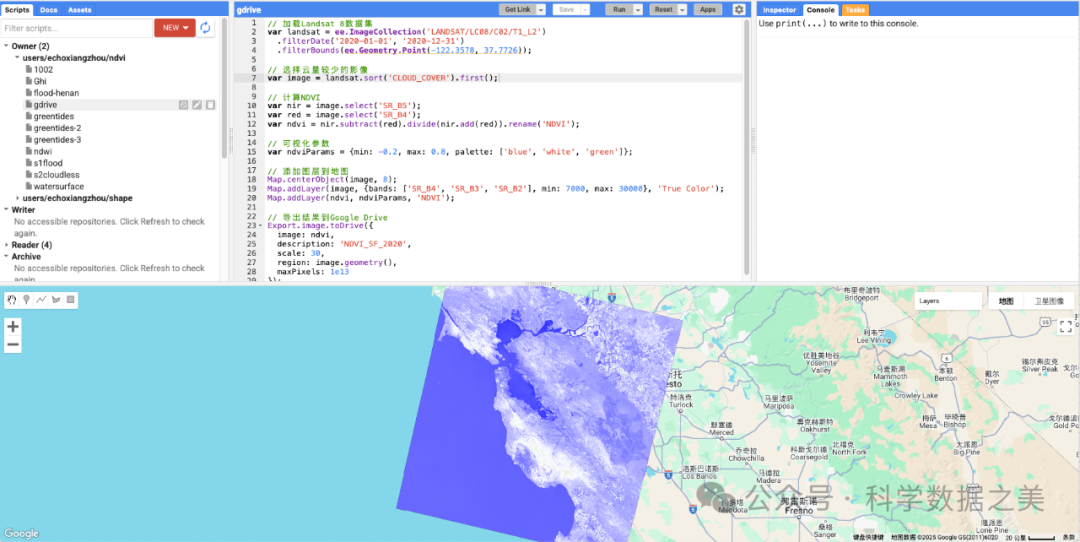
2.使用Python API
首先,安装Earth Engine Python API:
pip install earthengine-api然后,进行身份验证并使用API:
import eeimport geemapimport matplotlib.pyplot as plt
# Initialize Earth Engineee.Authenticate()ee.Initialize()
# Load Landsat 8 datasetlandsat = ee.ImageCollection('LANDSAT/LC08/C02/T1_L2') \ .filterDate('2020-01-01', '2020-12-31') \ .filterBounds(ee.Geometry.Point(-122.3578, 37.7726))
# Select image with less cloud coverimage = landsat.sort('CLOUD_COVER').first()
# Calculate NDVInir = image.select('SR_B5')red = image.select('SR_B4')ndvi = nir.subtract(red).divide(nir.add(red)).rename('NDVI')
# Visualization parametersndvi_params = {'min': -0.2, 'max': 0.8, 'palette': ['blue', 'white', 'green']}
# Visualize with geemapMap = geemap.Map()Map.centerObject(image, 8)Map.addLayer(image, {'bands': ['SR_B4', 'SR_B3', 'SR_B2'], 'min': 7000, 'max': 30000}, 'True Color')Map.addLayer(ndvi, ndvi_params, 'NDVI')Map
# Define a region of interest (San Francisco area)roi = ee.Geometry.Rectangle([-122.51, 37.70, -122.35, 37.81])
# Download NDVI data for analysis# Option 1: Use the full geometry object# region = image.geometry().bounds().getInfo()# Option 2: Use a defined region of interestndvi_array = geemap.ee_to_numpy(ndvi, region=roi, scale=100)
# Visualize the downloaded dataplt.figure(figsize=(10, 8))plt.imshow(ndvi_array, cmap='RdYlGn', vmin=-0.2, vmax=0.8)plt.colorbar(label='NDVI')plt.title('NDVI Values in San Francisco Area (2020)')plt.axis('off')plt.savefig('sf_ndvi_2020.png', dpi=300)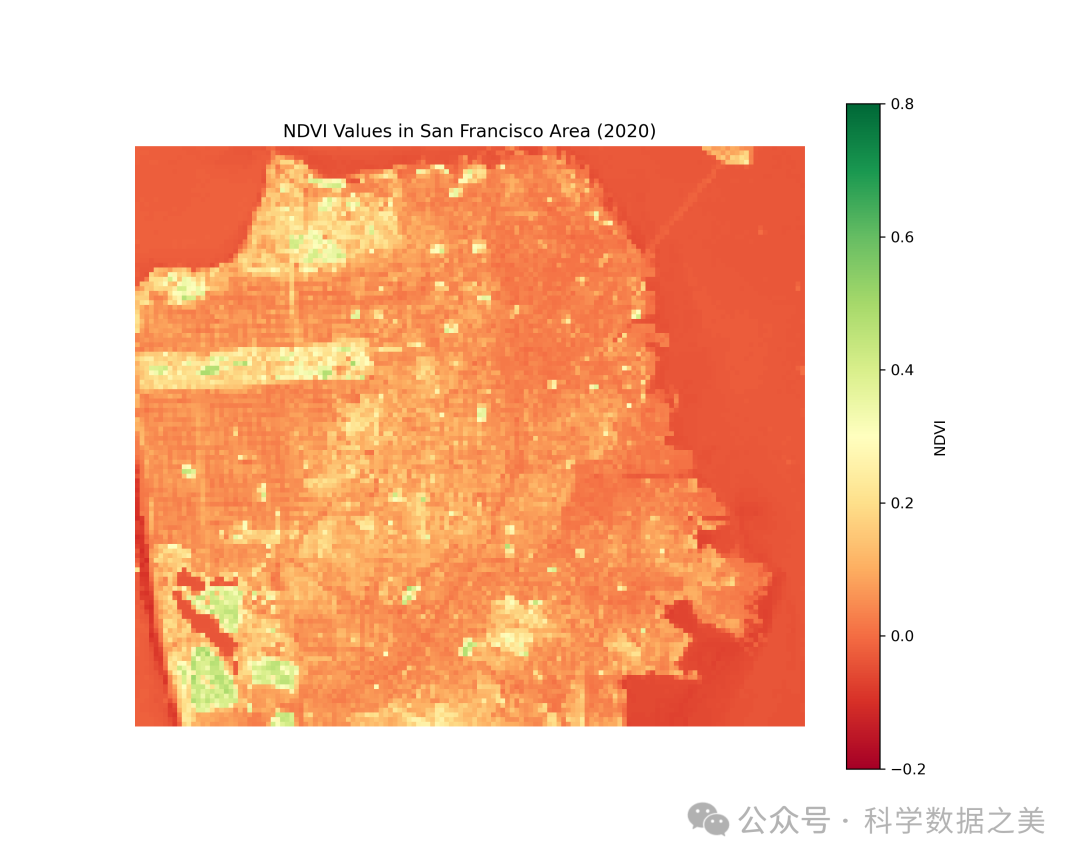
三、Microsoft Planetary Computer平台
Microsoft Planetary Computer是微软开发的一个基于云计算的地球系统数据与分析平台。该平台整合了地球观测数据、地球系统模型和分析工具等资源,结合强大的人工智能和计算能力,为用户提供一个理解和分析地球系统的工具。
Planetary Computer数据目录包含多种开放数据集,包括:Landsat-8/9系列、Sentinel-1/2/3/5系列、MODIS产品、全球土地覆盖数据、高分辨率土地使用数据、水文数据、生物多样性数据、高分辨率卫星影像等。
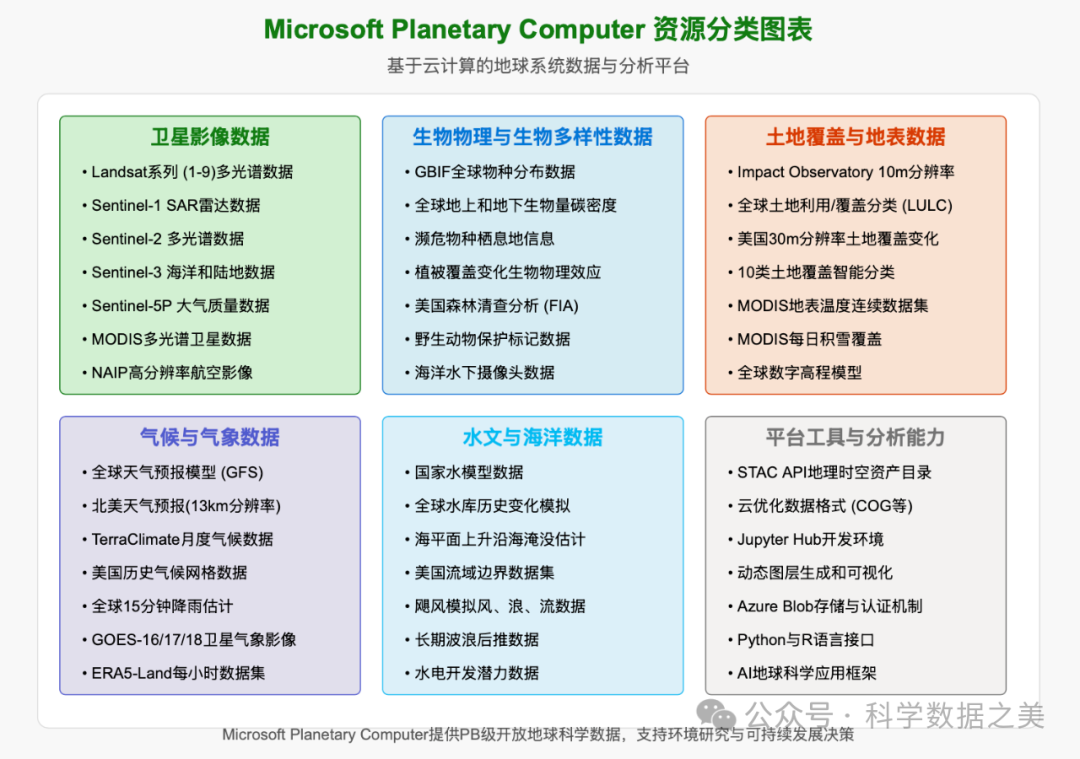
该平台采用STAC标准组织数据,并提供交互式的Jupyter环境,使用户能够直接在云端分析PB级数据,而无需下载。
地址:https://planetarycomputer.microsoft.com
使用方法
要使用Microsoft Planetary Computer,您需要创建一个Microsoft账户并注册Planetary Computer。注册批准后,用户可以使用Python API以编程方式访问数据。
使用Python API
在本地环境中安装必要的库:
pip install planetary-computer pystac-client rioxarray matplotlib然后使用API访问数据:
import planetary_computerimport pystac_clientimport rioxarray as rxrimport matplotlib.pyplot as pltimport numpy as np
# 连接到STAC目录catalog = pystac_client.Client.open( "https://planetarycomputer.microsoft.com/api/stac/v1", modifier=planetary_computer.sign_inplace)
# 搜索数据search = catalog.search( collections=["io-lulc"], # 全球土地利用/土地覆盖数据 bbox=[114.0, 22.0, 114.5, 22.5], # 香港地区 datetime="2020-01-01/2020-12-31")
# 获取结果items = list(search.get_items())print(f"找到 {len(items)} 个符合条件的土地覆盖数据")
# 查看第一个数据项的信息if items: item = items[0] print(f"数据日期: {item.datetime.strftime('%Y-%m-%d')}")
# 获取土地覆盖数据URL lulc_url = planetary_computer.sign(item.assets["data"].href)
# 读取数据 lulc = rxr.open_rasterio(lulc_url)
# 土地覆盖类别 lulc_classes = { 0: "No Data", 1: "Water", 2: "Trees", 3: "Grass", 4: "Flooded vegetation", 5: "Crops", 6: "Scrub/shrub", 7: "Built Area", 8: "Bare ground", 9: "Snow/Ice", 10: "Clouds" }
# 创建颜色映射 cmap = plt.cm.get_cmap('tab10', 11)
# 可视化数据 plt.figure(figsize=(12, 10)) im = plt.imshow(lulc.values[0], cmap=cmap, vmin=0, vmax=10)
# 添加图例 cbar = plt.colorbar(im, ticks=range(11)) cbar.set_ticklabels([lulc_classes[i] for i inrange(11)])
plt.title(f"香港地区土地覆盖 (2020)") plt.axis('off') plt.savefig('hongkong_landcover.png', dpi=300) plt.show()
# 计算各类土地覆盖的面积比例 values, counts = np.unique(lulc.values[0], return_counts=True) total = counts.sum()
# 打印统计结果 print("\n土地覆盖类型分布:") for val, count inzip(values, counts): if val in lulc_classes: percentage = count / total * 100 print(f"{lulc_classes[val]}: {percentage:.2f}%")
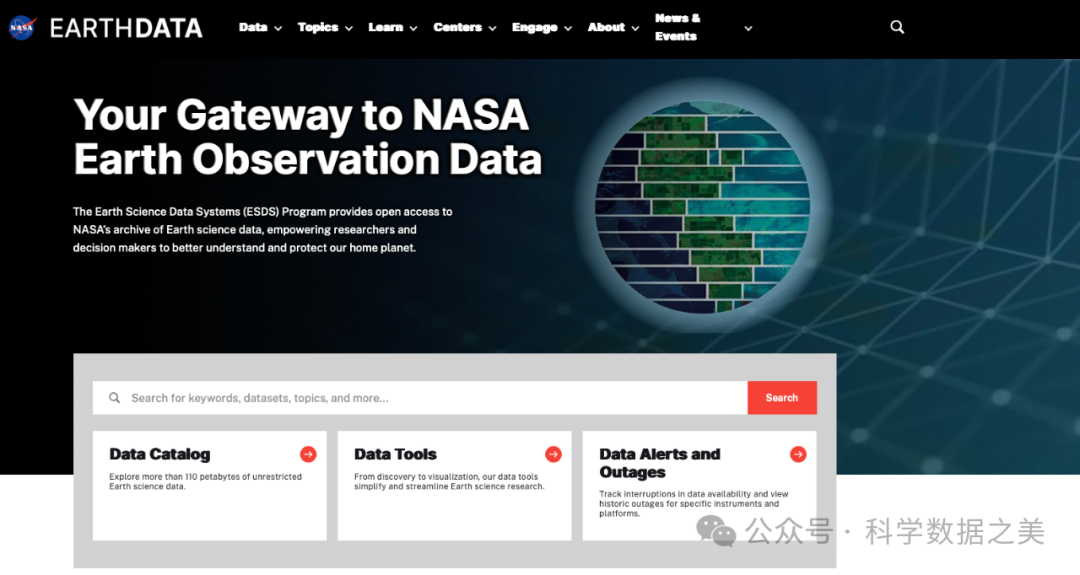
四、NASA CMR (Common Metadata Repository)
NASA CMR是NASA托管的所有地球科学数据集的统一元数据系统。它包含了来自NASA分布式活动归档中心(DAACs)的数据集信息,涵盖各种卫星任务、航空项目和实地观测。
CMR目前包含超过3万个数据集的元数据,包括所有主要的NASA地球观测卫星任务,如Terra, Aqua, Aura, Suomi NPP, SMAP, NISAR, ICESat/ICESat-2, GPM等。这些数据涵盖大气、海洋、陆地、冰冻圈等地球系统各个领域。
CMR-STAC是NASA最近开发的服务,它能够将CMR元数据转换为符合STAC规范的格式,使数据更易于被常用地理空间工具发现和使用。
使用方法
NASA的地球数据可以通过多种方式访问:
1.使用Earthdata Search
https://search.earthdata.nasa.gov
使用NASA Earthdata账户登录,然后通过界面查询所需的数据。
2. 使用Python访问CMR API
通过API以编程方式搜索和检索元数据。
import requestsimport jsonimport pandas as pd
# CMR API基础URLcmr_url = "https://cmr.earthdata.nasa.gov/search"
# 搜索数据集defsearch_datasets(keyword, limit=10): """搜索NASA CMR数据集""" url = f"{cmr_url}/collections.json" params = { "keyword": keyword, "page_size": limit }
response = requests.get(url, params=params)
if response.status_code == 200: results = response.json() return results.get('feed', {}).get('entry', []) else: print(f"搜索失败,状态码: {response.status_code}") return []
# 示例:搜索MODIS数据集modis_datasets = search_datasets("MODIS land surface temperature")
print(f"找到 {len(modis_datasets)} 个MODIS数据集")3. 使用NASA的CMR STAC API
提供符合STAC标准的数据访问接口。
import requestsimport jsonimport pystac_clientimport matplotlib.pyplot as pltimport rioxarray as rxrimport numpy as np
# 连接到NASA的CMR STAC APIstac_api_url = "https://cmr.earthdata.nasa.gov/stac/"
# 创建STAC客户端try: catalog = pystac_client.Client.open(stac_api_url) print("成功连接到NASA CMR STAC API")
# 搜索MODIS地表温度数据 search = catalog.search( collections=["MODIS/Terra Land Surface Temperature/Emissivity Daily L3 Global 1km SIN Grid V061"], bbox=[-122.5, 37.5, -122.0, 38.0], # 旧金山湾区 datetime="2021-01-01/2021-12-31" )
# 获取结果 items = list(search.get_items()) print(f"找到 {len(items)} 个MODIS地表温度数据项")
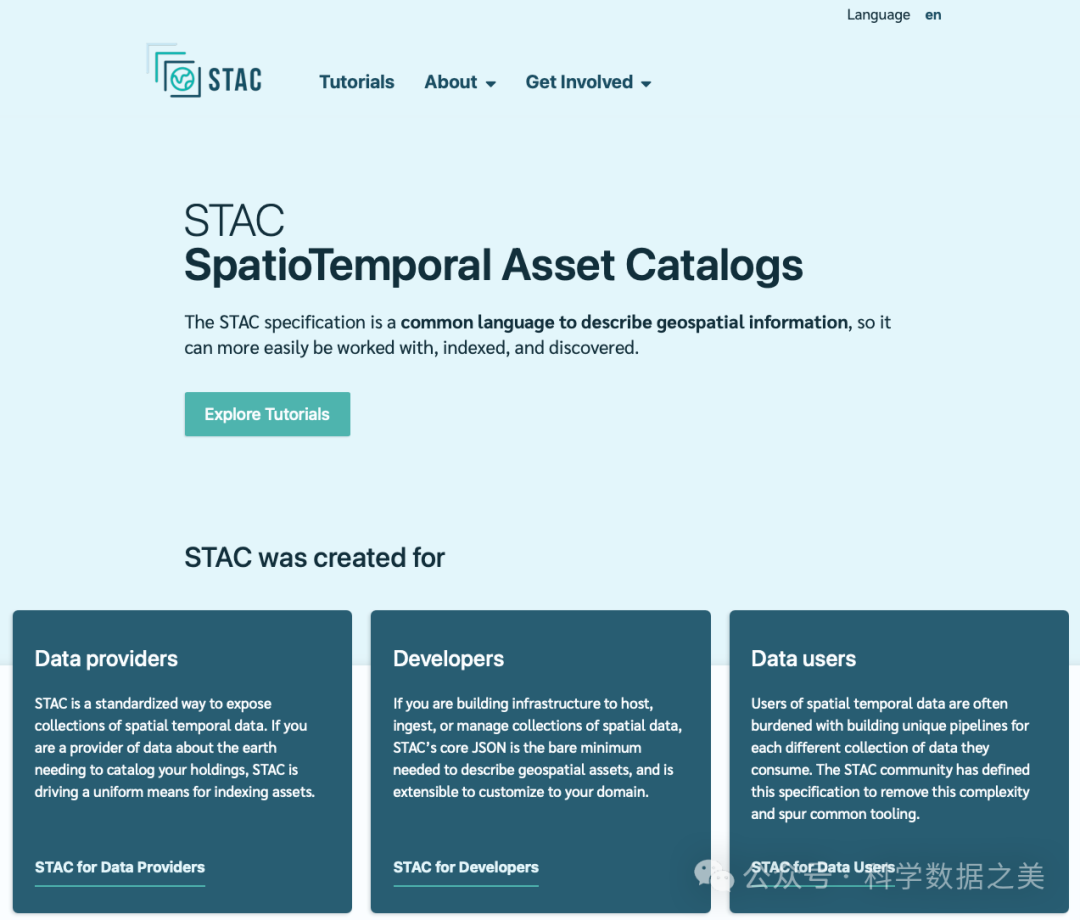
except Exception as e: print(f"连接NASA CMR STAC API时出错: {e}") print("NASA的CMR STAC API可能需要特定配置或凭证")五、STAC (SpatioTemporal Asset Catalog)生态系统
STAC(SpatioTemporal Asset Catalog)是一种旨在使地理空间数据更容易被索引和发现的开放标准。STAC规范提供了一种统一的方式来描述地理空间数据,使其可以被搜索引擎和地理信息系统工具轻松发现和访问。
STAC生态系统中的数据提供者包括政府机构、研究机构、商业卫星公司和开源项目。主要的STAC目录包括:Element84的Earth Search、Microsoft Planetary Computer STAC、NASA CMR STAC、AWS公开数据STAC、Sentinel Hub STAC等。
作为一个开放标准,STAC的主要优势是提供了一种统一的数据发现机制,减少了数据获取和处理的技术障碍。它通过标准化的JSON元数据格式,使不同来源的数据可以以相同的方式被访问和处理。
使用方法
使用STAC主要有两种方式:通过STAC Browser(Web界面)或通过STAC Client API(编程方式):
- 1. 使用STAC Browser
访问STAC Index网站(https://stacindex.org/catalogs),浏览各种可用的STAC目录:
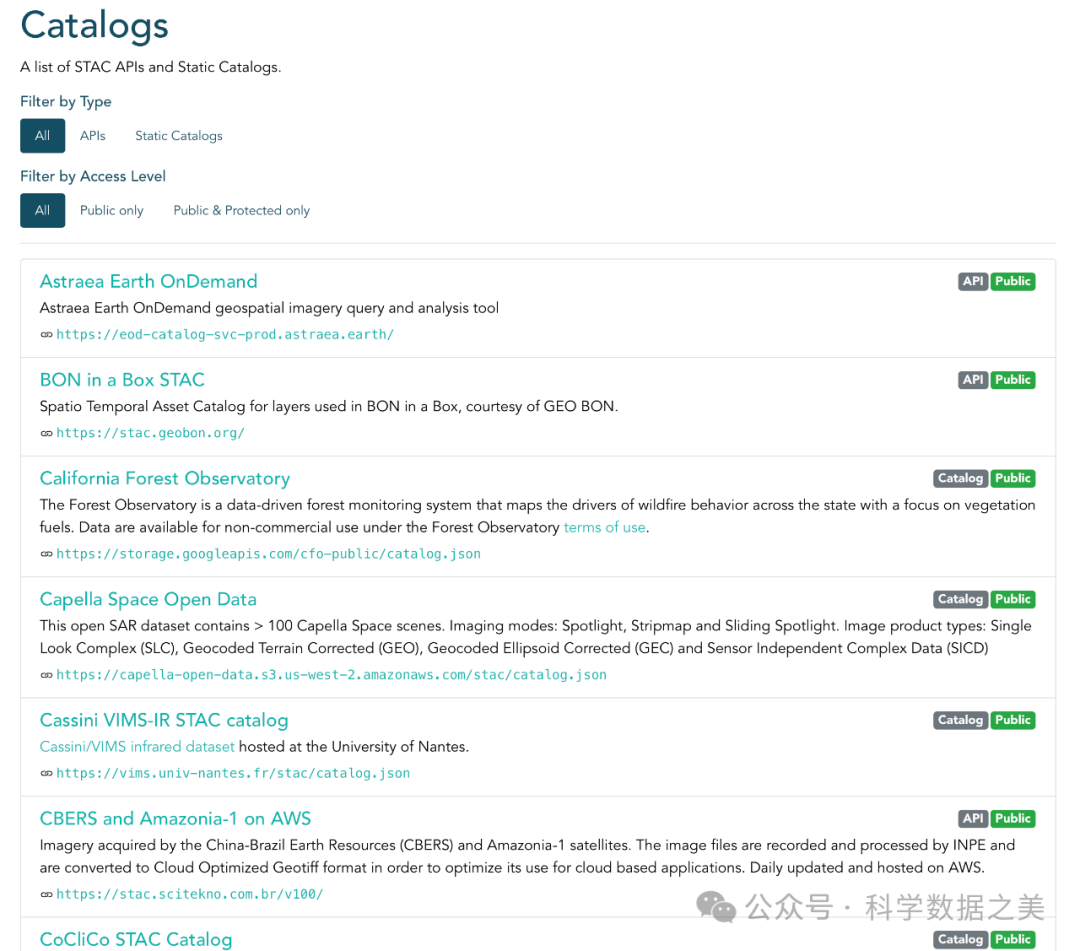
STAC Browser界面
- 2. 使用PySTAC客户端
import pystac_clientimport planetary_computerimport rasteriofrom rasterio.plot import showimport matplotlib.pyplot as pltimport numpy as npfrom shapely.geometry import boximport json
# 连接到STAC目录# 这里以Element84的Earth Search为例catalog = pystac_client.Client.open("https://earth-search.aws.element84.com/v0")
aoi = box(-80.3, 25.7, -80.1, 25.9)aoi_json = json.loads(json.dumps(mapping(aoi)))
# 搜索数据search = catalog.search( collections=["sentinel-s2-l2a-cogs"], intersects=aoi_json, datetime="2021-01-01/2021-12-31", query={"eo:cloud_cover": {"lt": 10}})
# 获取结果items = list(search.get_items())print(f"找到 {len(items)} 个符合条件的Sentinel-2影像")- 3. 跨STAC目录搜索
由于STAC是一个标准,我们可以创建工具来搜索多个STAC目录,如下例所示:
import pystac_clientimport concurrent.futuresimport pandas as pd
# 定义要搜索的STAC目录列表stac_endpoints = [ { "name": "Earth Search", "url": "https://earth-search.aws.element84.com/v0" }, { "name": "Microsoft Planetary Computer", "url": "https://planetarycomputer.microsoft.com/api/stac/v1", "modifier": lambda x: x # 实际使用时需要planetary_computer.sign_inplace }, { "name": "NASA CMR STAC", "url": "https://cmr.earthdata.nasa.gov/stac/" }, { "name": "Sentinel Hub STAC", "url": "https://services.sentinel-hub.com/api/v1/catalog/stac" }]
# 定义搜索参数search_params = { "bbox": [-122.5, 37.5, -122.0, 38.0], "datetime": "2021-01-01/2021-12-31", "limit": 10}
# 函数:搜索单个STAC目录defsearch_stac_endpoint(endpoint): try: # 打开STAC目录 client_kwargs = {} if"modifier"in endpoint: client_kwargs["modifier"] = endpoint["modifier"]
client = pystac_client.Client.open(endpoint["url"], **client_kwargs)
# 搜索数据 search_results = client.search(**search_params)
# 获取结果 items = list(search_results.get_items())
return { "endpoint": endpoint["name"], "url": endpoint["url"], "items_count": len(items), "items": items } except Exception as e: return { "endpoint": endpoint["name"], "url": endpoint["url"], "error": str(e), "items_count": 0, "items": [] }
# 并行搜索所有STAC目录results = []with concurrent.futures.ThreadPoolExecutor() as executor: future_to_endpoint = {executor.submit(search_stac_endpoint, endpoint): endpoint for endpoint in stac_endpoints} for future in concurrent.futures.as_completed(future_to_endpoint): endpoint = future_to_endpoint[future] try: data = future.result() results.append(data) except Exception as exc: print(f"{endpoint['name']} 搜索失败: {exc}")
# 显示搜索结果print("\nSTAC目录搜索结果:")for result in results: status = "成功"if"error"notin result elsef"失败: {result['error']}" print(f"{result['endpoint']}: {status}, 找到 {result['items_count']} 个项目")六、综合比较与选择指南
不同平台和数据目录各有优势和特点。以下是主要云平台地理空间数据资源的比较,帮助用户选择最适合其需求的平台:
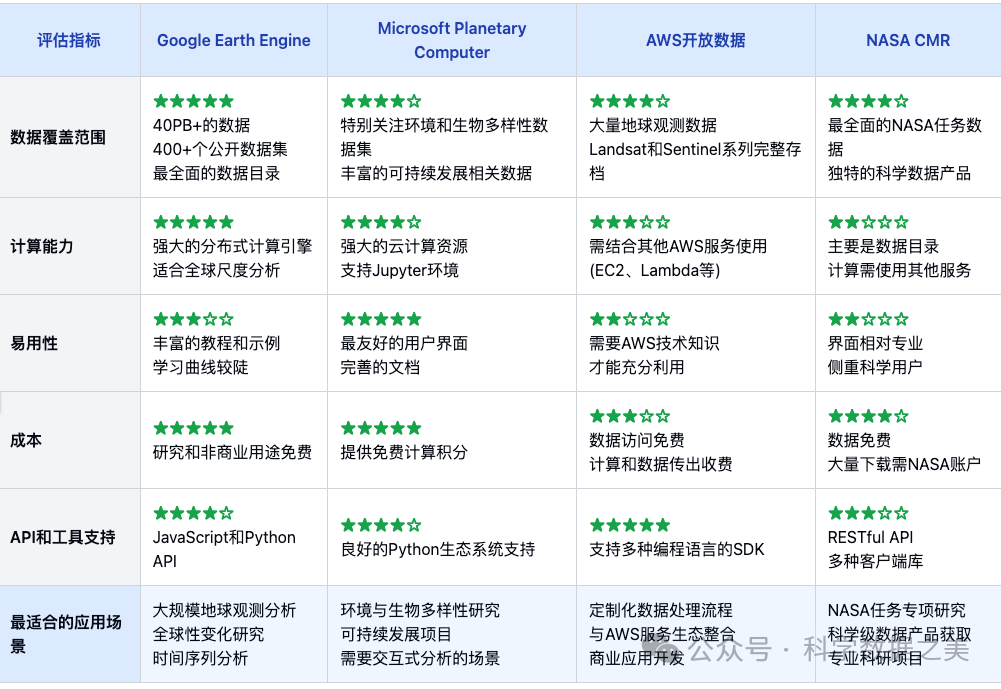
选择平台的建议:
- • 全球尺度分析: 选择Google Earth Engine
- • 地球环境和生物多样性研究: 选择Microsoft Planetary Computer
- • 需要灵活性和定制化处理: 选择AWS开放数据
- • NASA特定任务数据和科学产品: 选择NASA CMR
- • 多源数据集成分析: 使用STAC生态系统连接多个平台
本公众号相关内容推荐
- 一个交互式地理空间数据可视化python工具包
- ECMWF发布首个业务化运行人工智能天气预报模型
- 一个提供超过50PB地理空间数据的云平台
- 4个用于分析卫星遥感影像的开源应用软件
- 迄今最大规模基于Sentinel的AI-Ready数据集:Major TOM
- 20个用于卫星观测数据可视化的Python库
- Google发布AI天气预报系统实时与历史预报数据
- OceanSpy:一个提供海洋数值模式数据分析和可视化的Python包
- Segment-geospatial: 地理空间图像分割开源Python工具包
- DeepSeek AI创新:颠覆传统,重新定义大模型开发范式
- 大语言模型在科学研究中的应用
- 6个用于清洗地理空间数据的Python工具库
- AllClear:用于卫星影像云去除的综合数据集
- 深度学习技术在地理空间人工智能(GeoAI)中的应用
- xgcm-通用环流模式后处理Python工具包
- GeoAI:地理信息与人工智能的交叉融合
- 深度学习提升全球海洋涡旋动力学卫星观测能力
- 基于xarray扩展的开源地图可视化Python库
- NOAA 发布世界磁场模型 WMM2025
- 推荐10个用于处理GIS和遥感数据的Python库
- ECMWF的AI天气预报系统AIFS开放模型权重参数
- The Well:可用于机器学习研究的15TB 物理模拟数据集
- 推荐6个美化Matplotlib可视化样式的python库
- AI天气模型的现状与未来
- 流式传输和渲染可视化三维地理空间数据
- GIS领域常用的24种数据格式
- 一种基于图神经网络的三维建筑模型重建方法
- WebGIS技术栈推荐
- 使用Python工具可视化大型图网络
- 使用NetworkX提取图网络特征
- Argo海洋观测数据处理分析python库:ArgoPy
- 在Jupyter环境中创建交互式可视化地图
- 处理和可视化地理空间数据的Python库:EarthPy